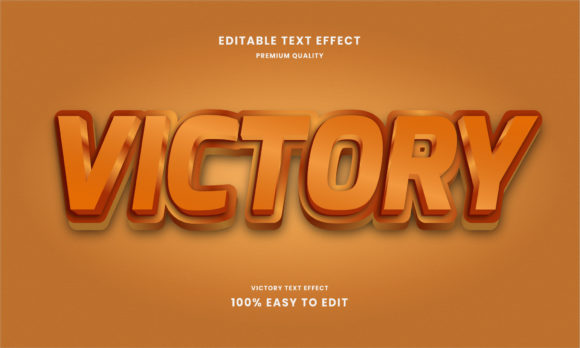
Victory 3D Text Effect: Integrating Bold Typography into Your Design Workflow
A strong headline or title can make the difference between a viewer pausing or scrolling past. The Victory 3D Text Effect offers a polished, dimensional look that turns ordinary text into a focal point. But beyond its visual appeal, the real value lies in how it fits into a broader design, marketing, or content production process. This article walks through what the Victory 3D Text Effect is, how to plan for its use, integrate it into real projects, and manage it for long-term consistency.
What Is the Victory 3D Text Effect?
The Victory 3D Text Effect is a pre-built typography style that adds depth, shading, and often metallic or glossy highlights to letterforms. It is commonly available as a Photoshop layer style, a set of layer styles, or as a mockup template. Unlike manually creating 3D text from scratch, this effect provides a consistent, high-quality result with minimal adjustments. It is designed to work with standard font files, so you can apply it to almost any typeface while preserving the 3D characteristics.
This tool sits at the intersection of efficiency and design quality. Instead of spending hours modeling text in 3D software, designers and non-designers alike can produce professional results in minutes. That makes it particularly useful for content creators, small business owners, and marketers who need eye-catching headers for social media, blog graphics, presentations, or product packaging but do not have dedicated 3D design skills.
Defining the Project Context
Before you open any design file, think about where the 3D text will appear. The Victory 3D Text Effect works well for short phrases, single words, or logos. Long paragraphs are not ideal because the effect can become overwhelming and reduce readability. Common applications include:
- Hero titles on landing pages
- YouTube thumbnail headlines
- Event banners and flyers
- Product names on packaging mockups
- Quote graphics for social media
Matching the effect to the medium is essential. A glossy metal finish may suit a tech product launch but feel out of place for a handcrafted brand. Understanding your brand’s tone and the audience’s expectations helps you decide which variation of the Victory 3D Text Effect to apply—or whether to customize it.
Collecting Assets and Fonts
The Victory 3D Text Effect usually requires a specific font family or a limited set of font weights to look its best. Before starting, download and install the recommended font, or test with a similar typeface that has clean, bold strokes. Avoid overly decorative or thin fonts, as the 3D extrusion may become unclear. Also gather any background images, textures, or color palettes that will surround the text. Having these assets ready streamlines the design phase and prevents mid-project delays.
Preparing the Document
Open your design tool (typically Adobe Photoshop) and set up a canvas that matches the output size. For example, a 1920x1080 pixel canvas for a video intro, or a square 1080x1080 for Instagram. If the Victory 3D Text Effect comes as a PSD file, open that file directly and replace the placeholder text with your own. Many such effects use smart objects, which makes text editing non-destructive. This is a huge advantage: you can change the wording without recreating the 3D effect.
If the effect is delivered as a set of layer styles, create your text layer first, then apply the styles. Ensure the text layer is rasterized (or at least aligned correctly) before applying complex layer styles. Double-check that the text color is set to a neutral or recommended base color—some effects rely on specific base hues to generate accurate highlights.
Adjusting and Fine-Tuning
No pre-made effect is one-size-fits-all. After applying the Victory 3D Text Effect, review the result at the actual output size. Sometimes the extrusion depth needs tweaking if the text is smaller than the original demo. Adjust the 3D depth, light angle, or bevel contour if your design environment allows. For layer-style-based effects, you can double-click the effect entry in the layers panel to modify settings like shadow distance, softness, or specular highlights.
One practical tip: if the background is dark, increase the contrast of the highlights so the text pops. For light backgrounds, a subtle drop shadow can help separate the 3D text from the background. Small adjustments like these make the difference between a generic effect and one that looks custom-crafted for your project.
Combining with Other Elements
The Victory 3D Text Effect rarely exists alone. It interacts with other design assets such as photographs, illustrations, gradient overlays, and particle effects. Here are several integration strategies:
- Layering with images: Place the 3D text over a blurred or dark background to maintain legibility. Use a soft brush to paint a shadow behind the text for added depth.
- Pairing with 2D typography: Use the 3D effect for the main headline, and keep subheadings or body text flat and minimal. This creates a clear visual hierarchy.
- Adding texture overlays: Apply a subtle noise or grain texture to the entire composition to unify the 3D text with a vintage or grunge aesthetic.
- Animating the effect: If you are working in motion graphics, export the 3D text as a PNG sequence with transparency, then bring it into After Effects or Premiere. Combine with keyframed position or scale for movement.
These integrations show that the Victory 3D Text Effect is not an island—it works best when the surrounding elements are designed to complement its volume and reflectivity.
Before: Planning the Visual Identity
If you are building a campaign that relies heavily on 3D typography, test the Victory 3D Text Effect early in the process. Create a style tile or mood board that includes the effect applied to a sample word. Share it with stakeholders to get feedback on readability and brand alignment. This upfront validation saves rework later. Also decide on a consistent treatment: will all titles use the same 3D preset, or will variations (e.g., different colors or extrusion depths) be used for different sections?
During: Streamlining Production
When you have multiple deliverables—say, a series of social media cards or a set of email headers—the Victory 3D Text Effect speeds up production. Create a master PSD file with the effect already applied to a smart object. Then duplicate that file for each variation, leaving only the text to change. This maintains visual consistency and reduces manual work. If you work in a team, store the effect file in a shared asset library so everyone uses the same version.
During production, keep a checklist of quality aspects: text spelling, alignment with gridlines, color harmony with brand assets, and export resolution. The 3D effect can sometimes enlarge the visible boundaries of the text, so adjust the canvas or make sure no important content gets cut off.
After: Output and Asset Management
After rendering, consider where the files go next. If you export a flat PNG or JPEG, the 3D effect is baked in. For projects that need later edits—like a website title that will be updated—keep the PSD file with the live effect intact. Organize these source files in a clear folder structure: project name, date, and version. This is especially useful for small business owners or freelancers who return to past designs for new content.
Also, document which font, color, and effect settings were used. This makes it easy to recreate the same look months later without trial and error. A simple text file or note inside the project folder can save significant time during rebrands or seasonal updates.
Maintaining Compatibility
The Victory 3D Text Effect may rely on specific software versions. If you update Photoshop or switch to an alternative editor, test the effect file before committing to a deadline. Some layer style effects from older versions may not translate perfectly. Keep a backup of the original effect file and note the software version used. For users who work across tools, consider exporting the 3D text as a high-resolution PNG with transparency, then importing it into Canva, Figma, or other platforms that do not natively support layer styles.
Customizing for Brand Consistency
A default effect rarely matches a brand palette exactly. Adjust the color overlay or gradient within the effect to align with brand colors. If the effect includes a metallic sheen, you can recolor it by adding a hue/saturation adjustment layer clipped to the text. For long-term use, create your own branded preset based on the Victory 3D Text Effect. That way, every piece of content carries a consistent, recognizable look.
Efficiency Through Templates
One of the best ways to integrate the Victory 3D Text Effect into a regular workflow is to turn it into a template. Build a design file with the effect pre-configured, the correct canvas size, and placeholder text. Save it as a template (e.g., .PSDT or a project starter). Whenever you need a quick header, you open the template, change the text, adjust the background if needed, and export. This approach works exceptionally well for bloggers, social media managers, and e-commerce sellers who produce content frequently but cannot afford to design from scratch every time.
Quality Control and File Handoff
When delivering final files to clients, printers, or developers, provide both the flattened output and the editable source file (if allowed). The flattened version guarantees that the Victory 3D Text Effect renders exactly as intended regardless of the recipient’s software. For web use, check that the text remains legible at smaller breakpoints—sometimes 3D text that looks great on desktop loses clarity on mobile. Consider creating a slightly larger version or a simplified fallback image for responsive designs.
For print projects, ensure the resolution is sufficiently high (300 DPI) and that any transparency is handled correctly. The Victory 3D Text Effect often uses transparent backgrounds, so confirm with the printer that the file format supports it. If in doubt, add a solid background layer to avoid unexpected transparency issues.
Conclusion: Making Victory 3D Text Effect a Reliable Part of Your Toolkit
The Victory 3D Text Effect is more than a quick design gimmick—it is a asset that, when used thoughtfully, enhances visual communication and saves time. By planning its use early, integrating it smoothly into your production process, and managing the output carefully, you can achieve a professional 3D look without becoming a 3D modeling expert. Whether you are a marketer refining a campaign, a content creator building a YouTube channel, or a small business owner designing product labels, this tool offers a practical shortcut to attention-grabbing typography. The key is to treat it as part of a larger system—one that respects brand identity, adapts to different media, and stays consistent over time.
Start with one project, apply the steps above, and you will quickly see where the Victory 3D Text Effect fits best in your own workflow. With a little practice, it becomes a go-to resource for any design task that needs a bold, dimensional statement.